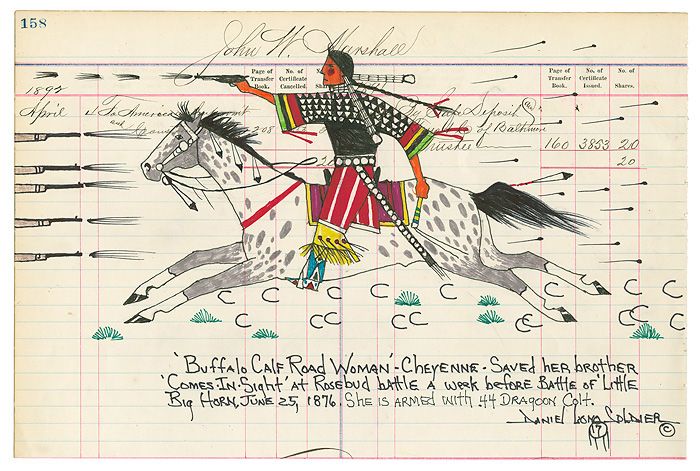
Saturday 16 March 2024

Sayid from White Sun of the Desert and the cat lady

 This next Basmachi figure is not as close a match for Sayid as the previous one is for Abdullah.  However, having enjoyed painting Abdullah, I felt a need to represent Sayid.  Sayid is a character from White Sun of the Desert - he is an ally for Sukhov, the main character.  At the start of the film, Sukhov rescues Sayid when he finds him buried up to his neck in the desert.  Through the rest of the film, Sayid shows up like a deus ex machina whenever Sukhov gets himself into too much trouble.  A very laconic character, when asked why he shows up just when needed most, his response is, "I heard shots".

Here is Sayid as Sukhov finds him.


Sayid wears a ragged striped kaftan for most of the film, and is a crack shot with a rifle.


So here is my take on the character.


I also finished up a cat lady from Pulp Figures.  Strictly speaking, she is not a Dangerous Dame, but rather an Arcane Academic.  My limited experience with cats has convinced me to put her with the DDs just to be safe!


Thursday 14 March 2024

02h00 (Oh Two Hundred Hours) AAR

 After participating in my Black Ops game back in December, Gord has been on me to try out 02 Hundred Hours, a game designed to simulate WWII partisan warfare, commando raids and similar special operations and wet work.  Last night, we finally managed to fit in a trial run!

Arthur set up the board, a small Italian village, centered around the town square.  Naturally we decided to fill the square up with all the activity to be expected on a busy market day.

The jolly grocer tries to convince the grumpy signora that the tomatoes are genuinely fresca, but she does not appear convinced.


Musicians and dancers put on an impromptu performance.


Then Gord arrived, and pointed out that the reason the game is called 02h00 is that the action takes place in the middle of the night, and during wartime so we can assume that a curfew would be in place.  So all the townsfolk went home, and we adjusted the layout a bit to allow more streets for unauthorised mischief.  The mission for the Italian partisans is to capture a German officer, and extract him for interrogation.  There are three possible places that he could be - in this case, one of the two churches, or the garage (the white building with the two big doors).


The cat, however, ignored the curfew ;^)


I selected a group of partisans, including a hero of the resistance (the lady with the MP40), a radio operator (Noor Inayat Khan),a partisan sergeant (with the red scarf), and five regular partisans.  This selection allowed me to choose several special mission cards, that gave me bonuses for when the action kicked off.  In particular, one of the cards allowed me to examine one of the three possible locations in advance, so my search for the German officer would be made a little easier.


I used my free search to check the church, and found that the officer wasn't there.  This was great for me, as that would have been the most difficult place to search, and so Gord's sentry there didn't slow my search.


Germans on roving patrol.


German sergeant checks in on his sentry at the cardboard church.


The partisan hero sneaks into the square to check the garage.


She opens the door of the garage, but is too noisy and generates an alert token allowing the German sentries to search for her.  On the positive side, though, she confirms that the officer is not in the garage.


Meanwhile, over by the resin church, the partisan sergeant and his compagno prepare to take out a German sentry.


The sergeant sneaks up on him and silently takes him out.


He then enters the church and apprehends the German officer.


And the hustles him into captivity, with his fellow partisans providing cover.


The team that captured the officer managed to make some noise, and the German sentries started toward them.  The partisan hero, having previously shed the alert token that she'd earned earlier, now took action to distract the guards.  She played her distraction card, and opened up on the guards.  This naturally attracted a lot of attention to her, but had the advantage of removing the token from the partisan sergeant and his prisoner.  She was also pretty effective with her Schmeisser, taking out one of the three German sentries.


But the alarm was definitely raised, and the German hauptmann dashed onto the board.  He mercilessly gunned down the heroic partisan!  But her distraction was enough, and the other partisans escaped with their prisoner.


All in all, it was a good, fun, suspenseful game.  It gave a very cinematic result as the partisans snuck around trying to avoid the sentries.  Meanwhile, Gord was frustrated as my dice rolling worked out to my advantage.  Even though I had many partisans running around the town, I was lucky and barely rolled any noise results, and was able to cancel out the few that did come up.  I can see that it would be great for solo gaming, as the guards/sentries are mostly on auto-pilot until the alarm is raised, and even then they still need to locate the partisans.

The game does require lots of markers on the board, which is an aesthetic thing that I'd prefer to avoid, but that is offset by the relatively small number of figures on the board.  I'll be ready to try the game again.

I am getting into Italian partisan music - will be looking at building a soundtrack for my next game!


Monday 11 March 2024

Great War Chain of Command AAR -Training the German Army

 I had Kevin, Peter and Doug over yesterday for another Chain of Command WWI trench bash.  This time we played Scenario 6 from Stout Hearts and Iron Troopers, training the Imperial German Army with an attack on an entrenched position.  The setting is spring 1918, during the famous Michael offensive.  The initial attack has passed over this British position, and the Germans are mopping up the isolated defenders.

Although the Patrol Phase is very important for Chain of Command, I skipped it for this scenario.  The Germans were given two jump-off points at the two shell craters on the right hand side of the image below.  The British were assigned one section each in the bunker and the two craters, which represent earthen dugouts.  


The pregame setup included a preliminary barrage, which inflicted shock and a few casualties on the British in their dugouts, and also created the breaks in the wire that the German force will pass through.

In the shot below, the Germans are advancing on the right against the rifle grenade section.  As the enemy is so close, the British simply used their rifles as rifles, no benefit to firing rifle grenades.  The markers behind the Germans show the two points of shock that have been added.


The Germans also had a sniper, who kept up a steady harassments on the defenders.


The rifle grenadiers were able to repel the first German squad, but then had to face the follow-on from the next squad.


German soldier up front issues an eviction notice to the Brits.  Note the shock markers and orange smoke representing a pin marker.


Aaaand the follow-on squad takes the trench.


Meanwhile on the left of the British line, a squad of German grenadiers comes on to issue their own eviction notice.


In the bunker at the centre of the line, the Lewis section continues to fire on any enemy they can spot, but it isn't enough to hold back the Hun.  The soldiers are actually inside the bunker, but their models have been placed on top for reference. 


German grenadiers approach along the trench line.  An uncannily accurate barrage of grenades subdues the British defenders (no, really, Doug rolled amazingly well, hit after hit, as each grenade toss became harder!).  Overwhelmed, this broke the force morale for the defenders, and they fled off the table.


It was a good game, despite a few errors on my part.  When the first German squad broke, I didn't transfer any of their shock to the following squad when the survivors fled through them.  Peter, playing the Brits, didn't send his runner at the first opportunity, so by the time he got off the table to alert the platoon HQ and the reinforcements, it was too late for them to arrive. Another challenge for the Brits was having their three sections isolated from each other.  This was a deliberate part of the scenario, so perhaps in a future play through I'll see if the British player can act to bring sections closer together to support each other. Intriguingly, the Germans attacked with an LMG squad rather than using it to suppress the defenders - and I'm certain the soldiers wouldn't have appreciated all the 'bullet sponge' comments before they broke!  

I'll try this scenario again, I think, with a few tweaks on the layout to make sure the Brits get a chance to bring on their platoon commander. 

Sunday 10 March 2024

White Sun of the Desert Abdullah

There is a famous movie from the USSR called White Sun of  the Desert.  It is from 1970, and is very heavily influenced by Sergio Leone-style spaghetti westerns, except that instead of the American old west, it is set on the eastern shore of the Caspian Sea toward the end of the Russian Civil War.  The primary villain is a Basmachi bandit chieftain called Abdullah.  The Basmachi command figures from Siberia Miniatures bear a great similarity to the bandits from White Sun, so naturally I tried to make this figure, with his classic broomhandle Mauser, look as much like the one from the film as I could.


White Sun of the Desert is a great film, well worth a watch!  It can be found on YouTube with English subtitles.https://www.youtube.com/watch?v=Auj_u7wEyw8  Maybe once I get a few more of the Basmachis painted up, we'll be able to pay a What a Cowboy tribute to this classic 'Eastern'!

Sunday 3 March 2024

What a Cowboy at Bonsor

 Arthur had so much fun at last month's Trumpeter Society game night that he decided to organise a game for this month as well.  This time he chose a What a Cowboy game and set up a Rescue scenario.  Three banditos head into town to kidnap a group of townsfolk, and the black-clad lawmen move in to stop them.  We were joined by Kevin and Douglas for the game.

Here is the basic town layout.  The hostages are in the two-storey building in the centre of the town.


The Armadilo railway station.


The banditos move up the main street.


Manuel enters the hotel to grab the hostages.


The lawmen move up to the hotel.


The banditos secure the hostages on the second floor, and shoot down at the approaching lawmen.


From the balcony, Manuel takes out one of the lawmen.


A triple six on an activation roll, and a group of concerned citizens moves up to assist the lawmen.


Banditos on the balcony!


Another triple six and another group of gunmen appear at the railway station.


Seeing this, Ramone decides that discretion is the better part of valour, and moves toward the exit.


On the street, El Guapo engages the concerned citizens over the remains of the first lawman, as a preacher comes to offer last rites.


Ramone stalks the browncoats,


while El Guapo is chased around the corner of the ramshackle barn.


Manuel is forced off the balcony


The lawman jumps after him, but fails his jump roll and breaks his neck!


The last lawman chases down and finishes off El Guapo.  


The final tally was two dead lawman, one dead bandito and one captured, with the third fled the table.  In the close run fight, the lawmen manage a victory!